Badge Announcement

Sure, it was haphazard. We shat out a badge announcement tonight. You wanna know why? Because Kevin and Txnner put together such a beautiful intro/promo demo that it just begged for public consumption.

Yes. DC540 has a badge this year. This is the badge that was supposed to happen last year, but us ADHD misfits with demanding day jobs couldn’t get our shit together to complete it in time to release last year. And when we realized that, we relaxed. We were like, “Fuck it, we’ve got time to do it right. Let’s do it right.”

And I, for one, think we did.

So the badge is once again based on the RP2040. But this time, we didn’t use a prefab Pico devboard as a base. We went all out and did all the things we needed to rawdog the RP2040. We have EEPROM. We have flash. We have USB-C. We have Li-Po. We 3D-printed battery covers to protect the Li-Po. We painted and laser engraved and cut acrylic wings, and used sidelights to light them up. It’s fucking glorious. It’s eloquent. I think it’s the most beautiful badge we’ve done yet.

But it’s not just me. Kevin is ejaculating in his pants as well. This is a beautiful fucking badge.

But we didn’t stop there…

We have seven badge challenges this year. And NONE of them will be released before DefCon 32 Day 1. The winners of the challenges will receive beautiful laser-crafted physical trophy awards to commemorate their diligence and commitment to NoVa’s death cult. Something so glorious and displayworthy that we’re not even going to preview it here. The first THREE winners to complete all seven challenges at DC32 in-person will receive a trophy. The first VIRTUAL winner who can’t make it to DC32 will also receive a trophy.

We’ll do presales. We have assembled badges in-hand. We have lanyards. We have packaging. The only thing we don’t have yet is the documentation booklet. And we’re working on that. We’re going to do a limited presale, maybe 25 badges, maybe more, way before DefCon. Those presale badges will not have the final firmware, they’ll have some lovely demos and things you can play with, but they won’t have the badge challenge. Those who pick up our badge at DefCon will have a fully functional badge with the badge challenge loaded.

Those who preorder will have to make do with demos, features and maybe customizing it with your own software while you wait for DefCon Day 1. We’ll publish the pinouts and starter hints in the documentation booklet. On DefCon Day 1, we’ll release the final badge challenge firmware, it’ll be easy to reflash your badge with it.

Let’s be clear. We don’t WANT to do a presale. But we’re pretty heavily out of pocket for creating this year’s badge, and we need to recoup costs, hopefully before we get out to vegas. Not all of us make the big tech bro dollars. But we’re doing it. And we’re almost 100% ready.

You ready for the preview now? Here goes. Make sure you’re in a private place, because regardless of gender or personal junk, this badge might just give you some sort of boner. I present, the DC540 DC32 2024 Chakra Badge.
K40 Laser Calibration: Center That Beam!

We’ve been fighting with the K40 for what feels like months. Finally got it “working” reliably a few weeks ago, but at a higher power level than I expected, and it was still not cutting all the way through acrylic. Good enough for production — we could break off the pieces — but I knew from anecdotal evidence that it could be better, so I was disappointed.

Fortunately, it clearly went out of alignment this weekend. I was seeing double lines on the cuts. So I knew it needed aligning. Mirror alignment was something I had been mostly avoiding since unboxing this thing, since like a lot of K40 units, they put some sort of glue or caulk or other kind of sealer on the knobs/screws of the mirror alignments to kind of lock in factory alignment. Unfortunately, this was no longer cutting it (no pun intended) for me.

So I followed the alignment checklist, checking for alignment with the laser head at top left, top right, bottom left and bottom right, to see how far down the alignment rabbit hole I’d have to travel.

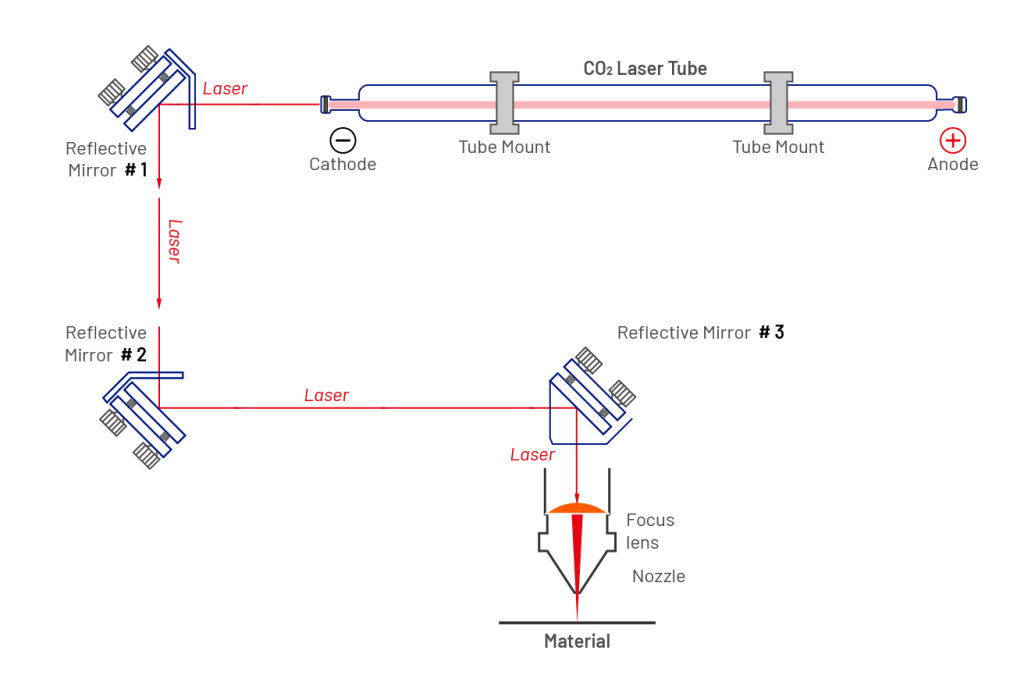
Background: K40 lasers use a series of three mirrors and a lens to focus the beam on the material in the bed. Mirror , right where the tube emits, takes the beam from the tube and brings it out into the play area. Mirror is on the near end of the traveling arm, and mirrors the beam from to mirror . Mirror is inside the laser head itself, and is basically a stationary mirror which reflects the beam from down to the material.

By putting tape over the hole in the laser head and then giving a short low-power burst, you can see exactly where in the hole the beam from Mirror is entering the laser head. Ideally, you’re bringing that beam into the center of the hole in the laser head, so that it will hit mirror dead center and thus hit the focusing lens dead center, for optimal energy transfer to the material.

Mine had been hitting fairly close to the edge of the hole, but since it was engraving and cutting somewhat satisfactorily and reliably, I had been ignoring it. The double lines showed me that it had gone further out of alignment. Sure enough, a piece of tape and a short burst indicated that the beam was striking even closer to the edge than before. So likely whatever beam was making it to the lens was weakened and skewed by the angle at which it was hitting.

So I removed the sealer from the knobs on mirror and started twiddling the knobs, using additional short bursts to check my progress, until I had the beam good and centered. I checked it at the four positions to ensure it was at the same position in all four. If not, I might have had to start working with mirror , which I was hoping to avoid due to added complexity. I was lucky. It was dead center.

I ran another test, and it came out perfect. No double lines, and none of the items on the 8×10 panel I was cutting required breaking off. This indicated to me that more energy was reaching the material surface, and thus I could potentially reduce power and passes and still have good results.

With the next two panels, I reduced by 5% power each and one cutting pass. So effectively I migrated from 65% power and 4 cutting passes to 55% power and 2 cutting passes, and my objects are still cutting and engraving perfectly. This afternoon I might try even more reduction. It’s hard for me to imagine a single-pass cut, but I’ll try it and see.

Center that beam, folks!