

We’ve been fighting with the K40 for what feels like months. Finally got it “working” reliably a few weeks ago, but at a higher power level than I expected, and it was still not cutting all the way through acrylic. Good enough for production — we could break off the pieces — but I knew from anecdotal evidence that it could be better, so I was disappointed.
Fortunately, it clearly went out of alignment this weekend. I was seeing double lines on the cuts. So I knew it needed aligning. Mirror alignment was something I had been mostly avoiding since unboxing this thing, since like a lot of K40 units, they put some sort of glue or caulk or other kind of sealer on the knobs/screws of the mirror alignments to kind of lock in factory alignment. Unfortunately, this was no longer cutting it (no pun intended) for me.
So I followed the alignment checklist, checking for alignment with the laser head at top left, top right, bottom left and bottom right, to see how far down the alignment rabbit hole I’d have to travel.
Background: K40 lasers use a series of three mirrors and a lens to focus the beam on the material in the bed. Mirror #1, right where the tube emits, takes the beam from the tube and brings it out into the play area. Mirror #2 is on the near end of the traveling arm, and mirrors the beam from #1 to mirror #3. Mirror #3 is inside the laser head itself, and is basically a stationary mirror which reflects the beam from #2 down to the material.
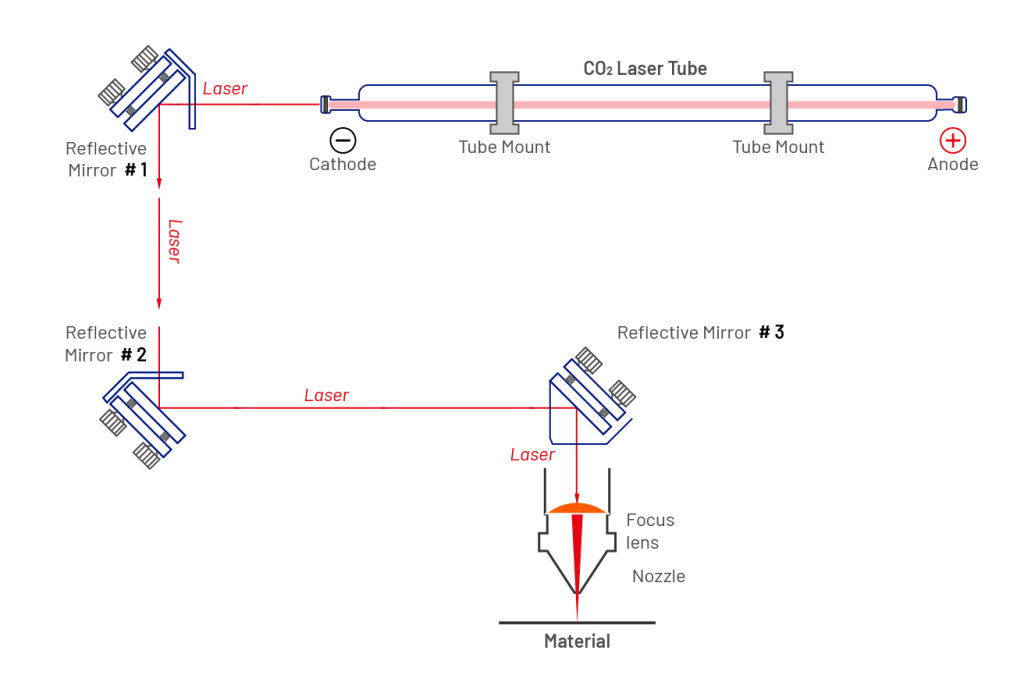
By putting tape over the hole in the laser head and then giving a short low-power burst, you can see exactly where in the hole the beam from Mirror #2 is entering the laser head. Ideally, you’re bringing that beam into the center of the hole in the laser head, so that it will hit mirror #3 dead center and thus hit the focusing lens dead center, for optimal energy transfer to the material.
Mine had been hitting fairly close to the edge of the hole, but since it was engraving and cutting somewhat satisfactorily and reliably, I had been ignoring it. The double lines showed me that it had gone further out of alignment. Sure enough, a piece of tape and a short burst indicated that the beam was striking even closer to the edge than before. So likely whatever beam was making it to the lens was weakened and skewed by the angle at which it was hitting.
So I removed the sealer from the knobs on mirror #2 and started twiddling the knobs, using additional short bursts to check my progress, until I had the beam good and centered. I checked it at the four positions to ensure it was at the same position in all four. If not, I might have had to start working with mirror #1, which I was hoping to avoid due to added complexity. I was lucky. It was dead center.
I ran another test, and it came out perfect. No double lines, and none of the items on the 8×10 panel I was cutting required breaking off. This indicated to me that more energy was reaching the material surface, and thus I could potentially reduce power and passes and still have good results.
With the next two panels, I reduced by 5% power each and one cutting pass. So effectively I migrated from 65% power and 4 cutting passes to 55% power and 2 cutting passes, and my objects are still cutting and engraving perfectly. This afternoon I might try even more reduction. It’s hard for me to imagine a single-pass cut, but I’ll try it and see.
Center that beam, folks!