

Nope. It doesn’t blink. Nope. It doesn’t have a screen. Nope. It didn’t cost us hundreds of man-hours and thousands of dollars to create. Check it out at this link:
PowerChute Network Shutdown and multiple UPSes
I gotta tell you, APC’s PowerChute Network Shutdown (PCNS) has a shitty interface.
And shitty documentation.
I was using it to control a UPS in a rack, and I thought, well, I have other racks with other UPSes, do I need a PCNS instance for each one? And I started down the rabbit hole.
The answer is no, I don’t. A single PCNS instance can handle multiple UPSes (or groups of UPSes, even).
The secret sauce is in two places:
- The first is finding the place to add additional UPSes: Go to PowerChute Setup, choose advanced, and continue forward through the menu pages until you reach the UPS Details page. There you can add additional UPSes (or UPS “groups”). That took a bit of looking to find.
- The second, and important part, I couldn’t find documented anywhere. Rather than using Shutdown Settings, go to Configure Events. Configure each event you want to action with a command file (command files must be in your user_files directory on the PowerChute server, in my case that was in /opt/APC/PowerChute/user_files) and the script must exist before it can be associated with an event. So write your script, make it executable (I used bash files, but I’m sure Python would work).
- The hidden part is the abstraction for multiple UPSes. I decided to use one for “PowerChute cannot communicate with NMC” as the test event and script. I
- made a test bash script that uses the system logger. I cycled through $@ with a for loop and logged each arg received by PowerChute, and discovered that two of the args passed contain the UPS name. I discovered this by shutting off the switchport connecting the UPS to the network. This is a nondestructive way to test this functionality, as in, you don’t want to test UPS events by yoinking power, at least not unless you’re ready for the consequences. I found no documentation for script variables anywhere, I just assumed since the system supports multiple UPSes that it would include them, and tested for them, and found they were indeed there.
- Once I have that, I can use PowerCLI for VMware (powershell plus some addons) to correlate events with the ESXi servers powered by the UPS. Example, query each ESXi server for running VMs and issue each a SUSPEND command, then shut down the ESXi server itself. This avoids VMs ungracefully losing power.
Hope this helps someone who might be looking for script variables for PowerChute.
ID Badge Printing fun
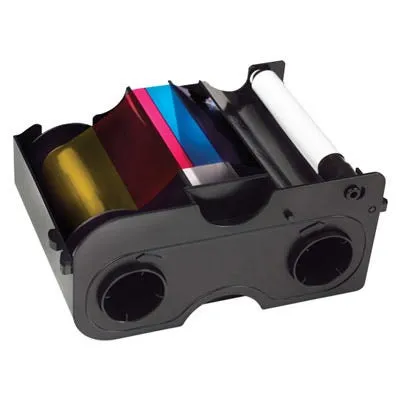
So some years ago I picked up a Fargo DTC400e id badge printer at auction. It was cheap, and something I wanted to fool around with. I had already been recreationally fooling around with magstripe and RFID cards, it just seems like a natural progression of interests.
A recent meeting revitalized my interest. There’s a thing the group wants to do and it might come in handy. I was all set to buy a dye sublimation printer and go down that route, either printing direct to cards or to vinyl transfer which would then be applied to the cards, when one of the members mentioned “id card printer” and them I remembered that I had this thing buried in a bin somewhere. I had futzed with it in the past, but did not get good results. Might have been the wrong kind of card to print on, might have been an aged ribbon, I abandoned it back then because “overcome by events” and lack of interest, but here I am looking into it again.
Here’s what I’ve found so far:
- The DTC400e was a decent card printer in its day. It was likely expensive in its day. Its day has passed. The ribbon cartridges appear to be discontinued, it’s likely that anything I’d be able to find in stock would be old stock. Someone is selling some on ebay that was manufactured in 2011/2012. I don’t think it was meant to last that long.
- Modern dedicated id badge printers are expensive. The cheapest I’ve managed to find is a very low-end $400 model that only prints on one side. The DTC400e can print on both sides. Most comparable models are over $1,000. For far less than that I could get a decent dedicated dye sublimation printer and do much more than ID cards with it.
- The DTC400e is used via the Fargo Workbench software. It’s so old that there are no Windows 10 drivers for it available. I even had quite a bit of difficulty finding the Windows 7 drivers for it. Eventually I did, and end up performing a staggering series of sysadmin feats of strength just to get to test mode:
- Installing Windows 7 via ISO didn’t recognize NICs in my HP ProOne600 G2 All-In-One PCs that I use for group stuff.
- Installing the NIC drivers after that resulted in an inability to install the workbench software due to dead Windows Update functionality on that obsolete Windows.
- I had avoided deploying Win7 from my FOG installation because I had broken my FOG installation in 2023 for some reason and didn’t want the extra steps of making that work again.
- But that’s what I ended up doing. Fixed FOG and deployed a Win7 image I had saved a few years ago. Fargo Workbench installed just fine on that, the DTC400e drivers I found installed fine, and now I have a valid test platform.
- Is it worth buying a new ribbon for somewhere between $60 and $150? Maybe. If nothing else, just for the experience. I found a YMCFOK ribbon slated to work with this unit for $82. Mostly I had been finding YMCOK ribbons, which would be fine. But the F is exciting:
- Y=Yellow
- M=Magenta
- C=Cyan
- F=Fluorescing! (security layer only visible with UV light)
- O=Clear protective overlay
- K=Black Resin
So that’s where I am now. The printer is reachable by the software on a reincarnated Win7 build from quite some time ago. I’m about to pull the trigger on a new ribbon. And a couple of us are taking a dye sublimation class this evening in case it goes that direction.
More meshtastic fun: Part 4: Range Testing
Of course, you want to know how far your signal is going in every direction. If you’re lucky, you have Kevin to test with who repeatedly types the word The into his app without letting you know if he’s actually seeing your messages. I am assuming that The is his auto-correct changing Test to The.
But if you actually want scientific data, you might want to look into the Range Testing feature (found in Module config). Assuming you’ve got two stable units, one goes mobile with you and one stays at a specific base. You set up both units for Range Test — the sender node and the receiver node. Set your stay-at-home node as the sender and your mobile node as the receiver, then drive around your area. You should be able to save results to a .csv file and the docs describe how to integrate that into mapping applications to visualize your received packets with their locations.
https://meshtastic.org/docs/configuration/module/range-test/
I hope to run a test this weekend. We’d love to hear about your results. Ideally, if you have multiple antennas and/or placement locations, this will give you real-world data, although time-consuming to generate, on how your signal makes it out into the world.
Meshtastic: Device options
As promised, another post to specifically discuss beginner Meshtastic device options. Whatever you order, if you’re in the US make sure you order the 915MHz version.
I started with a RAK Wisblock starter kit and a LilyGo T-Echo.
https://www.amazon.com/dp/B0CHKZJK9C
I ordered both because I was impatient. I knew the LilyGo was what I wanted to start with, but I also knew it would take a while, so I ordered the Wisblock to learn while I waited. And that worked out.
Some lessons from both:
- They will come with an older firmware. First thing to do is to flash it with the latest stable firmware. http://flasher.meshtastic.org
- Don’t fire it up without the antenna(s) connected. It could fry the unit. Just like in amateur radio.
- Channel 0 should likely default to LongFast with its default key, I think that’s AQ== but don’t take my word for it.
- If you want to try DC540’s custom channel, add it as channel 1. Name: DC540. 256-bit pre-shared key: OVRpanBCYjZ2WmVIZTRheVlSZDZZWGxUcElFNFRSaWo=
- Install the app on your phone, pair with your unit (Pin is probably 123456), and then watch Nodes and Map for things to pop up.
- Alternately, connect to your computer (use a USB-C cable that supports power AND data) and browse to client.meshtastic.org. Click “new device,” connect it to the serial port that’s obviously your device, and manage it that way. It’s a bit wonky and dies sometimes, just refresh the webpage to start over.
Ideally in the next 15-20 minutes you should see some local nodes pop up on your node list and map.
So far, the LilyGo seems more powerful than the Wisblock.
But something I noticed, when you’re looking at your node list, you can see what type of device the other nodes are running. One thing I noticed is that the farthest node I could see was running a Station G2. So that tells me that maybe the Station G2 transmits more powerfully. (Or maybe that user has a better antenna, or an external antenna).
Next, I started mucking around with MQTT. MQTT is the same type of networking, but over an MQTT server on the internet. If you’re frustrated by lack of nodes, you can light this up to see more and communicate with other weirdos around the world. But be aware, you’re cheating, and it’s going to cut into your radio knowledge improvement. Is it worth it? Probably.
When using MQTT through a mobile-paired device, you turn on “proxy through client.” If your device has its own wifi, turn that shit off. As far as I can tell, you can’t use MQTT through a serial-connected device without its own wifi.
That led me to my next purchase, the LilyGo T-Beam Supreme. It has built-in wifi.
The Station G2 also has its own wifi, but I’m not there yet.
More later. This should be enough to help you get started. Any questions? Join our Discord and ask in the Meshtastic learning channel.
Let’s all learn Meshtastic together!

So a recent discussion with one of our members led me to finally jump into Meshtastic. I wonder how many of y’all want to play along…
Meshtastic, in this particular use case, enables a text-based messaging system that uses LoRa radio, which is 915MHz in the US, which measures its general range in miles, but the Meshtastic firmware enables a self-assembling mesh network of these devices. There is also internet backbone capability via MQTT servers.
It FEELS like early BBS days to play on.
I think a lot of us entered the world of infosec from a perspective of wanting to be able to see the data that’s hidden in plain sight. At least I did. Starting in around fourth grade when I read a book on codes and ciphers, much of my tech fetish has been about finding that hidden information that’s just out of reach. And of course, much of that is in the radio spectrum.
I became licensed for amateur radio back in 2010, I think. I took, and passed, all three exams in the same session. I have a number of radios. Three or four HF radios, a mobile dual-band for 2m and 70cm, and probably three or four Baofeng handhelds sitting in a bin somewhere. I have made overseas contacts from my car, my home and elsewhere using a portable kit in a Pelican case. I’ve done voice contacts as well as data modes. I have made a couple of attempts to learn and retain CW. One day that will stick.
While I can’t imagine Meshtastic will ever take off as a widespread communciations platform, I do think it could be useful in a potential off-grid scenario, and is worth exploring and pushing its capabilities. Meshtastic devices are cheap, easy to work with and fun. My next post will talk about some specific devices that I’ve started playing with, and my experiences with them, and I’d love for someone else to jump in and provide other perspectives on their experiences.
Nova Labs: Consistent Meetup Space
Dear Members,
Based on recent exciting conversations, and a tour a few weeks ago, we are excited to announce a significant step forward in our efforts to grow our group and provide greater access to resources and learning opportunities. We are initiating a six-month trial membership at the Associate Level with Nova Labs, a state-of-the-art makerspace located in Fairfax, VA (www.nova-labs.org). This represents an opportunity for our organization to expand our reach and serve the community more effectively.
Why Nova Labs?
Nova Labs offers a facility equipped with advanced tools, workshops, and collaborative spaces designed to foster innovation, creativity, and learning. With this membership, we gain access to:
- A centralized and consistent public location for member meetups, classes, and hands-on projects.
- Access to equipment for formal classes, including 3D printers, soldering tools, reflow machine and pick and place.
- A community of makers with similar passions.
Sustaining the Vision
To offset the cost of dues for Baab, the primary DC540 representative who will hold the membership, we are introducing an optional dues-based membership program. These contributions will directly support our ability to host regular classes, facilitate community outreach, and cover the costs of this trial partnership. Memberships can be set up quickly and easily via PayPal subscription buttons, (link in right column of website) with the following levels:
- Observer: $10/month
- Supporter: $20/month
- Driver: $50/month
- Hidden Hand: $100/month
We are not officially requiring membership dues, or tying membership to dues payments at this time. This is voluntary at this stage. By supporting at any level, you help us lay the groundwork for consistent meet-ups and our longer-term vision: establishing our own independent hackerspace.
We chose the Paypal subscription model because (a) Paypal already recognizes us as a nonprofit, and (b) the subscription model allows us to focus our limited efforts on generating content and activities rather than hounding people for dues. If you’re in, you’re in. If you’re not, you’re not. If we get enough buy in to sustain this, yay. If not, boo.
There is an alternate, privacy-focused option for membership as well, for those with concerns. However, payment info will not be published or released by us either way.
Join Us in Building the Future
This six-month trial is our first step in exploring what’s possible with the right resources and support. With your involvement, we aim to offer regular classes, foster collaboration, and extend our community outreach. At the end of this period, we’ll evaluate sustainability and work toward the exciting possibility of launching our own dedicated space.
We invite you to become a dues-paying member or attend our upcoming events at Nova Labs. Every contribution strengthens our mission to make creativity, innovation, and learning accessible to all.
Gather your questions for upcoming meetings, including tomorrow night’s virtual meeting.
Thank you for your unwavering support. Together, we are building something truly special!
Respectfully,
Treasurer
DC540
Custom wings add-on?
Hey, anybody interested in custom wings for your Chakra badge? I mean, some of you are certainly equipped to make them yourself, but say you’re not, or you’re a poor like most of us, but you’re artistically inclined, and you want something really personal on your wings. Hit us up, let us know what you want, and what you think a fair price is, and let’s get to burnin’ some plastic.
Badge Shipping Disabled! DEFCON BABY!
Badge shipping was just disabled from the ecommerce shop. You can still order a Chakra Badge, but only for pickup at Defcon. Around 60 badges are on their way to Las Vegas right now, and when they’re gone, they’re gone. We have not yet had deep discussions on whether there’ll be another run of these. It’ll be based on demand and other factors.
If you want to pick up at Defcon, we can accommodate you. We’ve got agents stationed at Sahara, Fontainebleu, the Marriotts, and even Paris. We’ll make it work for you.
We love the reaction we’re getting from recipients of this badge, and we’re super proud of it. In fact, we’re proud of ALL the amazing badges that are coming out of the woodwork this year!
Even if you don’t buy one of our badges this year, come hang out with us. We’ll be at the DCGroups room at least some of the time, and we’ll announce on our main Discord page when we’re planning to be somewhere.
Production firmware for the badge should be released at 8AM on Thursday, at which point the competition begins. Do your research, don’t get left behind!
Chakra Badge Status Update
We assembled, tested and packaged the last of the Chakra badges at last night’s meeting, the last in-person group meeting before the big event.
I’m going to disable shipping for badges tonight. So if you want one shipped, and it’ll make it to you in time, order it today.
I have added “in person pickup at Def Con” as a shipping option. So if you’d like to reserve one for pickup in Vegas, use that option. Then make sure we find each other during the con.
If you plan on getting one, you can either reserve one by ordering it that way, or you can take your chances that we’ll have some left at con. We’ve sold over half of our supply, and we’ll probably bring about 50 to Vegas with us.
We’re very happy with the community’s response to this badge, and the feedback we’ve gotten so far. We finished the prize trophies this week, and decided not to post them in advance, so they’ll be a surprise. Again, the first three in-person finishers and the first remote finisher of our badge challenge will get a trophy!
Turns out EVERYONE will have fo flash the final firmware. Never fear, it’s easy. Just make sure you have a USB-C cable and a computer. Or find one of us, we’ll probably be able to do it for you at con. The final firmware is done, we just didn’t have time to flash all the badges before packing them up, so they all have demo firmware on (which is beautiful, but not competitive).